In this exercise, we will learn how Java programs are compiled and executed and explore some of the fundamental constructs of the Java language.
Table of contents
Open Table of contents
How Java programs run
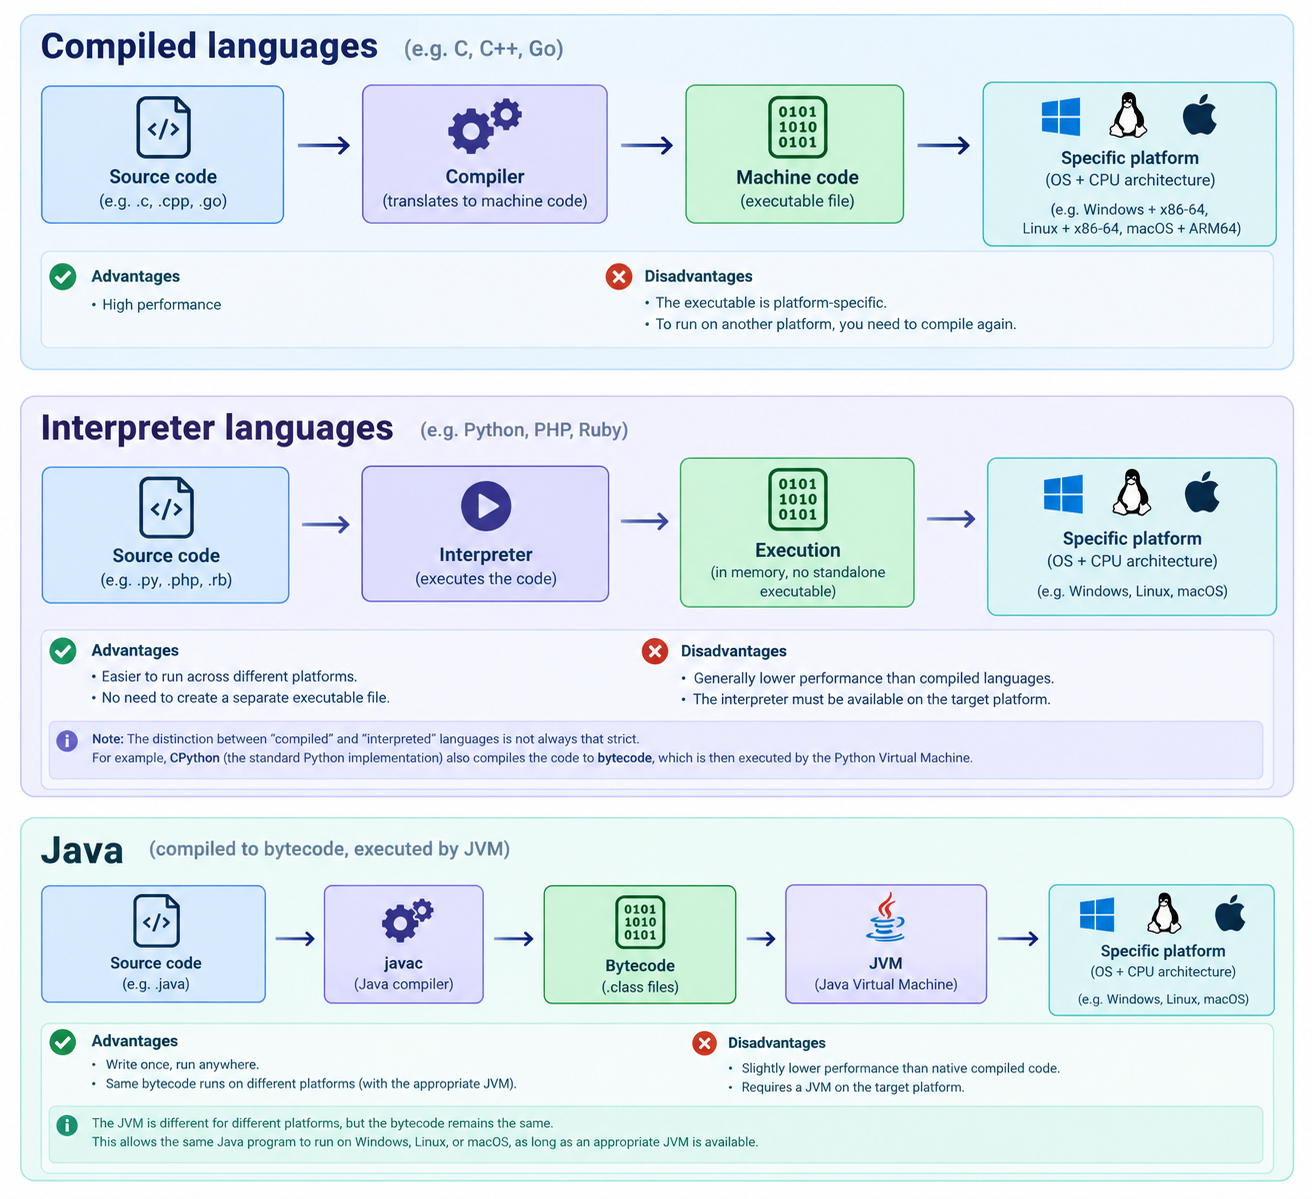
Java is a compiled language, but unlike C/C++, Java is not normally compiled directly to machine code.
Java source code is compiled by javac into bytecode, which is stored in .class files.
The bytecode is then executed by the Java Virtual Machine (JVM).
This allows the same Java bytecode to run on different platforms, as long as an appropriate JVM is available.
Java source → javac → bytecode → JVM → operating system / CPU
This is the idea behind “Write once, run anywhere.”
Read more about compiled, interpreted and Java programs
Compiled languages
- In languages such as C, C++, and Go, the source code usually goes through a process called compilation. A compiler is a program that transforms the code written by the programmer into machine code or another form intended for execution on a specific platform. By platform, we can mean a combination of an operating system and processor architecture — for example, Windows + x86-64, Linux + x86-64, or Linux + ARM64. The resulting executable file is usually specific to the platform for which it was compiled.
Interpreted languages
- Languages such as Python, PHP, and Ruby are commonly executed using a special program called an interpreter. The interpreter takes the source code and executes it without first producing a standalone machine-code executable. Note: The distinction between “compiled” and “interpreted” languages is not always that strict. For example, CPython also compiles Python source code into bytecode.
Java
- Java uses a different approach. The Java compiler (
javac) compiles Java source code into an intermediate form called bytecode, which is stored in.classfiles. The bytecode is then executed by the Java Virtual Machine (JVM). This is where the famous idea comes from: “Write once, run anywhere.”
Now, let’s compile and run our first Hello World Java program:
- Create a directory, named
HelloWorld. - Paste the following contents into
HelloWorld.javafile:
public class HelloWorld {

    //the main(...) method is the entry-point of our program
    public static void main(String[] args) {
        System.out.println("Hello World!");
    }

}HelloWorld.java- To compile your Java program, open a terminal and run the following command:
javac HelloWorld.java-
At this point, you should see a newly created file
HelloWorld.class, which contains the Java bytecode. -
Go back to the Terminal and run your Java program, by using the following command:
java HelloWorld- Now you should see the “Hello World!” message in your Terminal. Congratulations, you have run your first Java program!
IntelliJ IDEA
Compiling and running Java programs manually from the terminal is useful for understanding what happens behind the scenes. As you can see, it can be a tedious process, especially for big and more complicated programs. Therefore, in practice we usually use an Integrated Development Environment (IDE).
For this course, we will use IntelliJ IDEA.
An IDE provides us with tools for writing, compiling, running and debugging our programs.
Creating our first IntelliJ IDEA project
- Open IntelliJ IDEA.
- Select New Project.
- Select Java as the project language.
- Make sure that a JDK is selected.
- Name the project
FirstProject. - Create the project.
Inside the src directory, create a new Java class named Main.
public class Main {

    public static void main(String[] args) {
        System.out.println("Hello from IntelliJ IDEA!");
    }

}
Run the program using the Run button next to the main method.
So, to do a quick recap:
- JDK (Java Development Kit) — contains the tools needed to develop Java programs, such as the
javaccompiler, which compiles Java source code into bytecode (.java→.class). - JRE (Java Runtime Environment) — contains the JVM and the Java class libraries needed to run Java applications.
- JVM (Java Virtual Machine) — executes Java bytecode.
In other words:
JDK
├── Development tools (javac, jar, ...)
│
└── JRE
    ├── JVM
    └── Java Class Libraries
When we download and install the JDK, we get everything we need to both develop and run Java programs.
Variables and Data Types
Now that we know how to create and run a Java program, let’s start working with data.
A variable is a named location used to store a value. In Java, every variable has a data type, which determines what kind of value can be stored in it.
Unlike Python, Java is a statically typed language. This means that the type of a variable is known at compile time.
For example, in Python we can write:
age = 20
name = "John"
In Java, we explicitly specify the type of each variable:
int age = 20;
String name = "John";
The general syntax for declaring and initializing a variable is:
type variableName = value;For example:
int studentsCount = 25;
double averageGrade = 5.25;
boolean passed = true;
char group = 'A';
String courseName = "Java";
Primitive and Reference Types
Java data types can be divided into two main categories:
- Primitive types — store simple values such as numbers, characters and boolean values.
- Reference types — variables of these types hold references to objects.
Java has exactly 8 primitive types:
| Type | Example | Description | Range |
|---|---|---|---|
byte | byte age = 20; | 8-bit signed integer | -128 to 127 |
short | short year = 2026; | 16-bit signed integer | -32,768 to 32,767 |
int | int count = 100; | 32-bit signed integer | -2,147,483,648 to 2,147,483,647 |
long | long population = 8000000000L; | 64-bit signed integer | -9,223,372,036,854,775,808 to 9,223,372,036,854,775,807 |
float | float price = 10.5f; | 32-bit floating-point number | Precision: ~6-7 decimal digits |
double | double grade = 5.75; | 64-bit floating-point number | Precision ~15-16 decimal digits |
char | char group = 'A'; | 16-bit Unicode character | ’\u0000’ (0) to ‘\uffff’ (65,535) |
boolean | boolean passed = true; | true or false | true or false |
Note: Unlike the other primitive types, the Java Language Specification does not define a precise storage size for boolean. It can only have the values true and false.
Note:
Stringis not a primitive type in Java.Stringis a class, which makes it a reference type. We will discuss classes, objects and reference types in more detail later.
For integer types, the ranges can also be expressed as:
- byte:
−2⁷to2⁷ − 1 - short:
−2¹⁵to2¹⁵ − 1 - int:
−2³¹to2³¹ − 1 - long:
−2⁶³to2⁶³ − 1
float and double are data types with Limited Precision:
double a = 0.1;
double b = 0.2;

//is it 0.3 ?
System.out.println(a + b);
Do not use float or double when exact decimal arithmetic is required, for example for monetary calculations.
Changing Variable Values
The value stored in a variable can be changed:
int age = 20;

age = 21;

System.out.println(age);
The output will be:
21However, we cannot assign a value of an incompatible type:
int age = 20;

age = "twenty"; // Compilation error
Since Java is statically typed, the compiler can detect this error before the program is executed. Trying to run the program will result in compilation error.
Operators
Now that we know how to store values in variables, let’s see what we can do with them.
Arithmetic Operators
Java provides the following basic arithmetic operators:
| Operator | Description | Example |
|---|---|---|
+ | Addition | a + b |
- | Subtraction | a - b |
* | Multiplication | a * b |
/ | Division | a / b |
% | Remainder | a % b |
For example:
int a = 10;
int b = 3;

System.out.println(a + b); // 13
System.out.println(a - b); // 7
System.out.println(a * b); // 30
System.out.println(a / b); // 3
System.out.println(a % b); // 1
Comparison operators
| Operator | Description | Example |
|---|---|---|
> | Greater than | a > 3 |
< | Less than | a < 3 |
>= | Greater than or equal | a >= 3 |
<= | Less than or equal | a <= 3 |
== | Equal | a == 3 |
!= | Not Equal | a != b |
int age = 20;

System.out.println(age >= 18); // true
System.out.println(age == 20); // true
System.out.println(age != 20); // false

int a = 3;
int b = 5;

System.out.println(a == b); //false
System.out.println( !(a == b)); //true
Logical Operators
| Operator | Name and Description | Example |
|---|---|---|
&& | Logical AND. Returns true if both statements are true | a > 5 && a < 10 |
|| | Logical OR. Returns true if one statement is true | a > 5 || b < 10 |
! | Negation. Reverses the result, if statement is true returns false | !(a > 0) |
boolean hasTicket = true;
int age = 20;

boolean canEnter = age >= 18 && hasTicket;

System.out.println(canEnter); //true
Classes and Objects
So far, we have used types that are already provided by Java:
int age = 20;
double grade = 5.50;
String name = "John";
Java also allows us to define our own types by creating classes. Let’s create a simple Person class and use it:
- Create
Person.javafile with the following content:
public class Person {

    String name;
    int age;

    void sayHello() {
        System.out.println("Hello! My name is " + name +" and I am " + age + " years old.");
    }
}Person.java
A class defines the data and behavior that objects of that type will have. In our example:
- name and age are fields — they represent the data of a Person.
- sayHello() is a method — it represents behavior of a Person.
- Now let’s create an object of type
Person:
public class Main {

    public static void main(String[] args) {
        Person person = new Person();
        person.name = "Ivan";
        person.age = 20;

        person.sayHello();
    }
}Main.java
The expression:
new Person();creates a new object, also called an instance of the Person class.
Person personis a variable of type Person that holds a reference to the newly created object, hence in the statement:
Person person = new Person();Person-> typeperson-> variablenew Person()-> object
A class can be thought of as a definition of a type, while an object is a particular instance of that class.
- Now, lets add another person:
public class Main {

    public static void main(String[] args) {
        Person person = new Person();
        person.name = "Ivan";
        person.age = 20;

        person.sayHello();

        Person anotherPerson = new Person();
        anotherPerson.name = "Maria";
        anotherPerson.age = 22;

        anotherPerson.sayHello();
    }
}Main.java
Reading Input from the Console
So far, the values used by our programs have been written directly in the source code:
String name = "Ivan";
int age = 20;
Let’s make our programs interactive by reading these values from the
console.
Java provides the Scanner class, which we can use to read user input:
import java.util.Scanner;

public class Main {

    public static void main(String[] args) {
        Scanner scanner = new Scanner(System.in);

        System.out.print("Enter your name: ");
        String name = scanner.nextLine();

        System.out.print("Enter your age: ");
        int age = scanner.nextInt();

        System.out.println(
            "Hello " + name + "! You are " + age + " years old."
        );
    }
}Main.java
Notice that Scanner is also a class:
Scanner scanner = new Scanner(System.in);Here, scanner is a variable that holds a reference to a Scanner
object.
Now, let’s create a person object, and populate it’s name and age by typing their values into the console:
import java.util.Scanner;

public class Main {
  public static void main(String[] args) {

    Scanner scanner = new Scanner(System.in);

    System.out.print("Enter your name: ");
    String name = scanner.nextLine();

    System.out.print("Enter your age: ");
    int age = scanner.nextInt();

    System.out.println("Hello " + name + "! You are " + age + " years old.");

  }
}